I Love Being an Outdoor Family, but…
As much as I love being outdoors in the wintertime, there are times in which I find myself having to be clever in bringing the outdoors indoor. I remember as a kid begging my parents to set up the camping tents in our living room for me to use as an indoor playhouse. Now as a parent myself, I see that putting up and taking down a tent in one afternoon can be a little time consuming. That’s where this Tablecloth Tent/Indoor Playhouse for Kids comes in. Easy set up, easy take down and hours of fun for your kids!

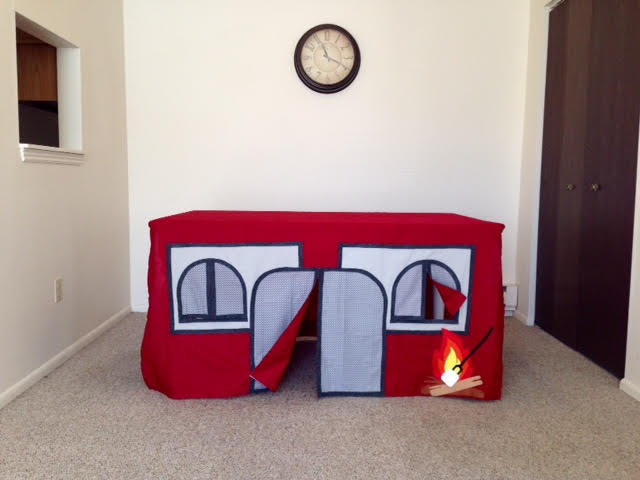
Indoor Playhouse for Kids
These tents can be fully customizable to your own desire. I recommend sitting down with some paper and color pencils and play around with different colors. Maybe even duplicate it after your very own family camping tent! I took an image of a tent that I have recently been eyeing and mimicked the same colors and design. Let your kids help! Half the fun for them is being able to create with you! Here is the process of what I ended up using and doing below…
This article contains affiliate links. We earn from qualifying purchases.
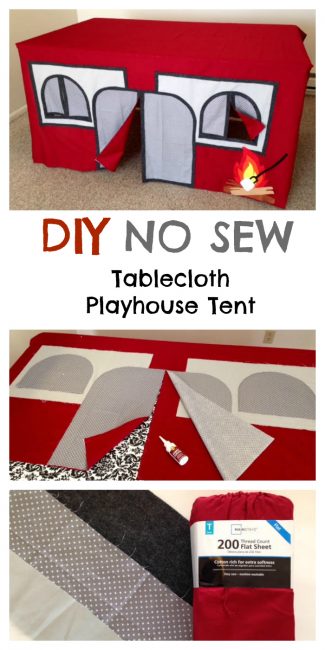
Pin This for Later…..
Materials Needed:
- 1 red tablecloth or bed sheet (I used a new twin flat sheet for $5 at Walmart)
- ½ yard of dark grey fabric for tent door and windows
- ½ yard of light grey fabric for tent background
- ¼ yard grey felt for tent trim
- Tape measure
- Fabric glue
- Hot glue gun and extra glue sticks
- Fabric scissors
Optional Materials:
- Red, orange, yellow, white, black and brown felt sheets for s’more campfire
- Small set of twinkle lights
- Command strips (for hanging lights under the table)
Step 1:
Trim tablecloth or bed sheet to fit table.
*A twin sheet fit my table perfectly, without any trimming needed.
Step 2:
Take light grey fabric and cut out 2 rectangles for tent background design.
Step 3:
Take dark grey fabric and cut out 2 windows and 1 door shape.
Step 4:
Place the tablecloth on a flat workspace. Arrange window and door pieces on the tablecloth and fabric glue down the top and side edges of windows and door.
*Be sure to leave the bottom of windows and door unglued (You will be cutting a slit in the windows and doors in the next step).
Step 5:
From the bottom of windows and door, cut a middle slit upwards through all layers of fabric (this will open up the door and windows).
Step 6:
Fabric glue the edges of the newly cut window/door layers together.
Step 7:
Cut felt into ½ in. strips. This will be used as trim to hide the rough edges of fabric. Arrange around the edges of windows and door. This time use hot glue and glue felt into place.
*I find that hot glue works better on felt.
Step 8:
Let fabric glue dry at least 4 hours before draping the tablecloth over the table edges
Optional Steps:
– Place Command strips underneath table and hang twinkle lights!
– Cut and hot glue a felt campfire and s’more stick!
Who wouldn’t LOVE this playhouse for kids? In just a few hours, you could create your very own playhouse and the kids will ask to go “camping” all winter long. So get crafting, grab a cup of hot chocolate, and have a great fun indoor camping with your kids.
If you love this idea for an indoor playhouse for kids, please check out these:
What are the dimensions of the table that you made this tent for?
Such an awesome idea!!! My kids are always asking me to help them build a fort in my livingroom, using chairs & blankets. We’ve used safety pins, clothes pins & weights to keep blankets from slipping, but inevitably the blankets pull apart or the weights used aren’t heavy enough. This would solve all our falling apart fort problems, be quickly & easily set up AND all of my furniture can stay where it is & hubby won’t get grumpy trying to get around the livingroom without breaking his neck on all of the fort paraphernalia! Thank you so very much for posting this!!! I’m headed to Walmart right now?